Rayplicker Handy
To view the registered shades on your device, click on the “magnifying glass” icon from the home screen. Use the arrows in the upper band to navigate and view the different recorded shade takings. For information, you can register up to 40 files into the device. Once transferred to the Rayplicker Vision software, a file is automatically deleted from the device memory.
No, the Rayplicker Handy device is not influenced by the external environment thanks to the calibration tip positioned at the top of the measuring head.
However, if the positioning of this tip is too far from the reference tooth, it no longer acts as a darkroom and the outside light will interfere in the shade taking. It is essential that the grey calibration tip remains in contact with the adjacent teeth and the gingiva.
If a retractor is used (to get access to posterior teeth for example), it is recommended to take the shade in a low light environment. We advise you to follow the following recommendations:
- Remove the dental operating light from the patient’s mouth or turn it off,
- Your patient should have his back to the window in case of direct sun exposure.
To configure your Rayplicker Handy device on another reference shade guide, connect your device to the computer by positioning it on its docking station and then connect it by USB.
The device must be turned on and on the home screen. From your Rayplicker software, click on settings / device / change device shade guide.
Select your device, then select the shade guide of your choice and click on configure.
- Please make sure you respect the shade taking protocol (see PDF below : “Rayplicker Best Practices”)
- Please check the integrity of the calibration tip
If these two points are respected but you still see shade differences, it may be useful to use another shade reference. Indeed, some shade guides are more representative of the color space of natural teeth than others. Use the L * a * b * / L * c * H coordinate analysis tool on Rayplicker software to check if the chosen reference shade guide is the most representative on the analyzed tooth.
A high Delta E ndicates a significant colorimetric difference between the analyzed tooth and the closest shade determined by the spectrophotometer. A conversion to another shade guide might help you find a closer shade.

The docking station must be connected to the computer by USB.
Place your Rayplicker device on its station. The station should light up blue. If not, check that your device is properly inserted and that the device’s connectors are in contact with those of the base.
The device must be turned on and on the home screen.
From the main page of your software, click on the Rayplicker icon at the top left of the screen, your device will be automatically detected.
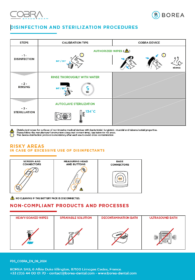
The tips shall be disinfected and autoclaved. (134 °C during 20 minutes, each tip has a validated lifespan for 100 autoclaving cycles).
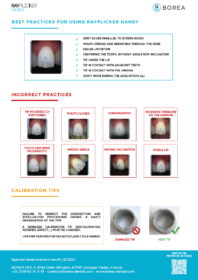
Please check regularly the quality of the internal surface of the tip. Its grey color should be mat and not shiny. The grey coating acts as a calibration chart (white balance).
If it is degraded, the calibration will be affected and the results potentially erroneous.
Your image is blurred or there are spots on it. Remember to clean the optical window from time to time
To do so, use the microfiber cleaning wipe provided in your Rayplicker pack.
Here are the seven important steps to achieve a correct shade-taking:
- Grey edges parallel to screen edges
- Mouth opened and breathing through the nose
- Saliva limitation
- Centering the tooth, without angle nor inclination
- Tip under the lip
- Tip in contact with adjacent teeth
- Tip in contact with the gingiva
Information: polarizing films are present on the sensor of your Rayplicker device. For non-polarized photos of your patient, please use the “Pics App Solution” mobile app or a camera.
Do not hesitate to consult the helpdesk page of your device: https://borea-dental.com/en/helpdesk-rayplicker-handy/
Your device’s battery might be discharged. Remember to recharge it.
To do this, position your device on its station during 1 to 2 hours for the Rayplicker to be efficient.
The charging station must be connected by USB to your switched on computer or by sector with the specific 5V 1A charger supplied in your Rayplicker pack. While charging, the docking station lights up blue. It turns off when charging is complete. For a full recharge, count 5 hours by plugging your Rayplicker device switched off into a power outlet.
It is recommended to avoid simultaneous USB and power outlet connections.
Using a charger other than the one supplied by Borea may damage your device.
Cobra
In order to carry out the disinfection and sterilization of your Rayplicker Cobra, be sure to follow the good practices indicated below in order not to damage the device.

In order to take a shade, make sure that the following points are validated:
- Your device must be light on and in video acquisition mode.
- The Rayplicker Vision must be connected and synchronized to the Cobra.
- The video stream must be in “activated” mode in the settings of your Cobra device from the Rayplicker Vision software
- The current user selected from the Cobra (from the Cobra wifi settings) must be the correct user.
If, despite this, the problem persists, there may be a network security problem (port opening, firewall, etc.)
Here are network technical details (intended for network administrators):
Communication Cobra:
- Protocols:
- TCP (ports: 6050/6051)
- UDP (ports: 6050/6051)
Stream Cobra:
- Protocols (Note that the protocols below are used for RTP [Real-Time Protocol] and RTSP [Real-Time Streaming Protocol]):
- TCP (port: 1234)
- UDP (port: 1234)
Attention: Firewall exception must be set for Rayplicker Vision application otherwise Cobra streaming cannot be played
Upload/download to/from Cobra device:
- Protocol: FTP (port: 21)
Rayplicker Software
old version
- Please check that your smartphone and your computer are connected to the same Wi-Fi network.
- The computer must be connected by Wi-Fi and not by an Ethernet cable.
- Please check that the file name does not contain any special characters.
- Borea recommends using only alphanumeric characters to name your files and avoid any archiving problems.
Information: The following special characters (<,>,:, “, /, \, |,?, *) are automatically replaced by underscores ” _ “.
The inability to send an order via Cloud can be related to various issues. Make sure to check that all the points below are validated:
- The laboratory receiving the order has been added to my contact list via the “Rayplicker community”. To confirm this, this lab must have a “cloud” icon next to its address. This indicates that this laboratory is equipped with the Rayplicker software solution.
- Your computer must have internet access. Check the connection in the “Settings / Administration” tab, the connection to the Rayplicker Cloud must be activated.
- The fields indicated in blue in the production tab must be completed.
- Please check that the import or export folder name does not include any special characters.
- To avoid any problems, Borea recommends that you use only alphanumeric characters to name your import / export folder.
- Please check that your computer has internet access.
- Check that the “Rayplicker Cloud Connection” is active in Settings> Administration.
- Make sure you have specified a postal address in Settings> Company> Address. If a dentist cannot find you in the Cloud and you do not receive orders, you may have forgotten to enter your address. To do this go to the settings tab of your software.
